El siguiente documento nos permitirá generar una interfaz CRUD de una entidad.
Primeros pasos
A continuación se muestra el contenido del archivo pom.xml con las dependencias:
1
2
3
4
5
6
7
8
9
10
11
12
13
14
15
16
17
18
19
20
21
22
23
24
25
26
27
28
29
30
<project xmlns="http://maven.apache.org/POM/4.0.0" xmlns:xsi="http://www.w3.org/2001/XMLSchema-instance"
  xsi:schemaLocation="http://maven.apache.org/POM/4.0.0 http://maven.apache.org/maven-v4_0_0.xsd">
  <modelVersion>4.0.0</modelVersion>
  <groupId>org.example</groupId>
  <artifactId>swing-jpa-skeleton</artifactId>
  <version>1.0-SNAPSHOT</version>
  <name>Archetype - Swing Data JPA</name>
  <url>http://maven.apache.org</url>
  <dependencies>
    <!-- https://mvnrepository.com/artifact/org.springframework.boot/spring-boot-starter-data-jpa -->
    <dependency>
      <groupId>org.springframework.boot</groupId>
      <artifactId>spring-boot-starter-data-jpa</artifactId>
      <version>3.2.4</version>
    </dependency>
    <dependency>
      <groupId>org.xerial</groupId>
      <artifactId>sqlite-jdbc</artifactId>
      <version>3.40.0.0</version>
    </dependency>
    <!-- https://mvnrepository.com/artifact/org.hibernate.orm/hibernate-community-dialects -->
    <dependency>
      <groupId>org.hibernate.orm</groupId>
      <artifactId>hibernate-community-dialects</artifactId>
      <version>6.3.0.Final</version>
    </dependency>

    <!-- https://mvnrepository.com/artifact/org.hibernate.orm/hibernate-community-dialects -->
  </dependencies>
</project>
Creamos una base de datos llamada library.sqlite y la guardamos en src\main\resources\library.sqlite
Y en esta base de datos creamos una tabla llamada book con dos campos:
1
2
3
4
CREATE TABLE book (
	id INTEGER NOT NULL PRIMARY KEY AUTOINCREMENT,
	name TEXT NOT NULL
);
Ya podemos crear el archivo src\main\resources\application.properties con el siguiente contenido:
1
2
3
spring.datasource.url=jdbc:sqlite:src/main/resources/library.sqlite
spring.datasource.driver-class-name=org.sqlite.JDBC
spring.jpa.database-platform=org.hibernate.community.dialect.SQLiteDialect
Después creamos la clase que va a implementar @SpringBootApplication
1
2
3
4
5
6
7
8
9
10
11
12
13
14
15
16
17
18
19
20
21
22
23
24
25
26
27
package jpaswing;
import jpaswing.ui.BookUI;
import org.springframework.boot.WebApplicationType;
import org.springframework.boot.autoconfigure.SpringBootApplication;
import org.springframework.boot.builder.SpringApplicationBuilder;
import org.springframework.context.ConfigurableApplicationContext;
import javax.swing.*;
import java.awt.*;
/**
* This is the Spring Boot Application class. This is where we make sure we're NOT running in Headless mode and that
* the WebApplicationType is set to NONE.
*/
@SpringBootApplication
public class SwingApplication {
public static void main(String[] args) {
ConfigurableApplicationContext context =
new SpringApplicationBuilder(SwingApplication.class)
.headless(false)
.web(WebApplicationType.NONE)
.run(args);
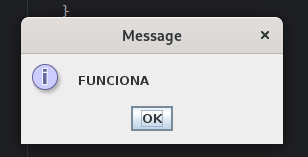
EventQueue.invokeLater(() -> JOptionPane.showMessageDialog(null, "FUNCIONA"));
}
}
Ya podemos probar que la aplicación funciona:
Todos estos pasos serán los necesarios para poder arrancar una aplicación creada con Spring y Swing.
Entidad
El primer paso va a ser crearnos un entidad base a partir de la tabla book
1
2
3
4
5
6
7
8
9
10
11
12
13
14
15
16
17
18
19
20
21
22
23
24
25
26
27
28
29
30
31
32
33
34
35
36
37
38
39
40
package jpaswing.entity;
import jakarta.persistence.*;

import javax.swing.*;

@Entity
public class Book {
    @Id
    //AUTO no funciona bien con SQLite porque intenta obtener el valor de una tabla de secuencias para cada tabla
    @GeneratedValue(strategy=GenerationType.IDENTITY)
    private Long id;
    private String name;
    public Book(){

    }
    public Book(String name) {
        this.name = name;
    }

    public Long getId() {
        return id;
    }

    public void setId(Long id) {
        this.id = id;
    }

    public String getName() {
        return name;
    }

    public void setName(String name) {
        this.name = name;
    }
    @Override
    public String toString() {
        return id + " - " + name;
    }
}
Repositorio
Creamos el repositorio:
1
2
3
4
5
6
7
8
9
10
package jpaswing.repository;

import jpaswing.entity.Book;
import org.springframework.data.repository.CrudRepository;
import org.springframework.stereotype.Component;

@Component
public interface BookRepository extends CrudRepository<Book, Long> {

}
Ventana
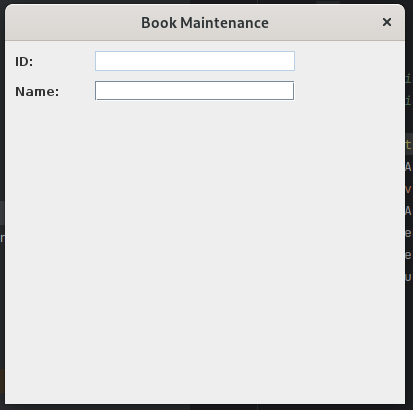
Ahora ya podemos crear la ventana que nos muestre el contenido de una entidad Book
1
2
3
4
5
6
7
8
9
10
11
12
13
14
15
16
17
18
19
20
21
22
23
24
25
26
27
28
29
30
31
32
33
34
35
36
37
38
39
40
package jpaswing.ui;

import javax.swing.*;

@Component
public class BookUI extends JFrame {
    private JTextField idField;
    private JTextField nameField;
    private JPanel panel1;
    public BookUI(){
        setTitle("Book Maintenance");
        setDefaultCloseOperation(EXIT_ON_CLOSE);
        setSize(400, 400);
        initComponents();
    }
    private void initComponents(){
        panel1 = new JPanel();
        idField = new JTextField(10);
        nameField = new JTextField(10);
        JLabel l;

        this.setLayout(null);
        panel1.setLayout(null);
        panel1.setBounds(0, 0, 500, 650);

        l = new JLabel("ID:");
        l.setBounds(10, 10, 70, 20);
        panel1.add(l);
        idField.setEnabled(false);
        idField.setBounds(10 + 80, 10, 200, 20);
        panel1.add(idField);

        l = new JLabel("Name:");
        l.setBounds(10, 40, 70, 20);
        panel1.add(l);
        nameField.setBounds(10 + 80, 40, 200, 20 );
        panel1.add(nameField);
        this.add(panel1);
    }
}
Modificamos SwingApplication para llamar a esta ventana:
1
2
3
4
5
EventQueue.invokeLater(()->{
    //obtenemos el objeto BookUI a través de Spring de tal forma que inyecte los componentes en el constructor
    BookUI bookUI = context.getBean(BookUI.class);
    bookUI.setVisible(true);
});
Ahora volvemos a probar:
Datos
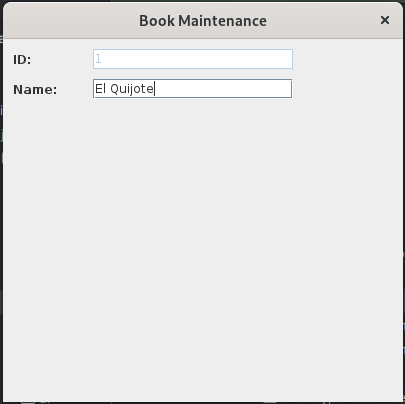
Ya podemos mostrar los datos de la tabla. Primero añadimos algún registro a la tabla book
Y ya podemos continuar. Vamos a crear una propiedad llamada book en BookUI para almacenar el libro que se está mostrando y un método que actualice los datos de la ventana:
En el repositorio creamos un método findFirstByOrderByIdAsc que nos devuelva el primer registro ordenado por id y al que llamamos en el constructor del IFrame.
1
2
3
4
5
6
7
8
9
10
11
12
package jpaswing.repository;

import jpaswing.entity.Book;
import org.springframework.data.repository.CrudRepository;
import org.springframework.stereotype.Component;

@Component
public interface BookRepository extends CrudRepository<Book, Long> {

    Book findFirstByOrderByIdAsc();
}
Ya solo queda mostrar los datos:
1
2
3
4
5
6
7
8
9
10
11
12
13
14
15
16
17
18
19
@Autowired
public BookUI(BookRepository bookRepository){
    setTitle("Book Maintenance");
    setDefaultCloseOperation(EXIT_ON_CLOSE);
    setSize(400, 400);

    this.book = bookRepository.findFirstByOrderByIdAsc();
    initComponents();
    updateData();
}
private void updateData() {
    if (this.book != null){
        idField.setText(Long.toString(this.book.getId()));
        nameField.setText(this.book.getName());
    }else{
        idField.setText("");
        nameField.setText("");
    }
}
Botones de navegación.
Vamos a generar la navegación de los datos:

Es evidente que hemos de crear 4 métodos:
first()que navegue al primer elementoprevious()que navegue al elemento previonext() que navegue al siguiente elementolast() que navegue al último elemento
Para ello vamos a aprovecharnos de un tipo de repositorio llamado PagingAndSortingRepository que ya provee de paginación y de ordenación:
1
2
3
4
5
6
7
8
9
10
package jpaswing.repository;

import jpaswing.entity.Book;
import org.springframework.data.repository.PagingAndSortingRepository;
import org.springframework.stereotype.Component;

@Component
public interface BookRepositoryPagination extends PagingAndSortingRepository<Book, Long> {

}
De momento vamos a crear una consulta que nos devuelva cuántos registros contiene la entidad actual:
1
2
3
4
5
6
7
8
9
10
11
12
13
package jpaswing.repository;

import jpaswing.entity.Book;
import org.springframework.data.jpa.repository.Query;
import org.springframework.data.repository.PagingAndSortingRepository;
import org.springframework.stereotype.Component;

@Component
public interface BookRepositoryPagination extends PagingAndSortingRepository<Book, Long> {
    @Query("SELECT COUNT(b) FROM Book b")
    public int countAllRecords();

}
En este caso, como no existía ninguna consulta de Spring que devolviera el total de registros, la he hecho a mano mediante @Query("SELECT COUNT(b) FROM Book b")
Y creamos un controlador que nos permita seleccionar el Book pertinente:
1
2
3
4
5
6
7
8
9
10
11
12
13
14
15
16
17
18
19
20
21
22
23
24
25
26
27
28
29
30
31
32
33
34
35
36
37
38
39
40
41
42
43
44
45
46
47
48
49
50
51
52
53
54
55
56
57
58
59
60
61
62
63
package jpaswing.controller;


import jpaswing.entity.Book;
import jpaswing.repository.BookRepository;
import jpaswing.repository.BookRepositoryPagination;
import org.springframework.beans.factory.annotation.Autowired;
import org.springframework.data.domain.PageRequest;
import org.springframework.stereotype.Component;

import java.util.Optional;

//Necesario para que se pueda inyectar con AutoWired
@Component
public class BookController {
    private final BookRepository bookRepository;
    private final BookRepositoryPagination bookRepositoryPagination;
    private int currentPage = 0;
    private int count;
    private Optional<Book> currentBook;
    @Autowired
    public BookController(BookRepository bookRepository, BookRepositoryPagination bookRepositoryPagination){
        this.bookRepository = bookRepository;
        this.bookRepositoryPagination = bookRepositoryPagination;
        this.count = bookRepositoryPagination.countAllRecords();
    }
    public Optional<Book> getBook(){
        //El primer parámetro es el número de página y el segundo los registros que queremos que nos devuelva
        PageRequest pr = PageRequest.of(currentPage, 1);
        currentBook = Optional.of(bookRepositoryPagination.findAll(pr).getContent().get(0));
        return currentBook;
    }

    public Optional<Book> next(){
        //Si ya estoy al final, devuelvo el libro actual
        this.count = bookRepositoryPagination.countAllRecords();
        if (currentPage == this.count -1 ) return currentBook;

        currentPage++;
        return getBook();
    }

    public Optional<Book> previous(){
        //Si ya estoy al principio, devuelvo el libro actual
        if (currentPage == 0) return currentBook;

        currentPage--;
        return getBook();
    }

    public Optional<Book> first(){
        //Primer libro
        currentPage = 0;
        return getBook();
    }
    public Optional<Book> last(){
        //Último libro
        this.count = bookRepositoryPagination.countAllRecords();
        currentPage = count - 1;
        return getBook();
    }

}
Y modificamos la ventana para poner los botones de navegación:
1
2
3
4
5
6
7
8
9
10
11
12
13
14
15
16
17
18
19
20
21
22
23
24
25
26
27
28
29
30
.....
private JButton btnFirst;
private JButton btnPrevious;
private JButton btnNext;
private JButton btnLast;
....
private void initComponents(){
.....
    	//Creamos los cuatro botones y los posicionamos
        btnFirst = new JButton("<<");
        btnFirst.addActionListener(e -> first());
        btnPrevious = new JButton("<");
        btnPrevious.addActionListener(e -> previous());
        btnNext = new JButton(">");
        btnNext.addActionListener(e -> next());
        btnLast = new JButton(">>");
        btnLast.addActionListener(e -> last());
        btnFirst.setBounds(20, 260, 60,40);
        panel1.add(btnFirst);

        btnPrevious.setBounds(100, 260, 60,40);
        panel1.add(btnPrevious);

        btnNext.setBounds(180, 260, 60,40);
        panel1.add(btnNext);

        btnLast.setBounds(260, 260, 60,40);
        panel1.add(btnLast);
.....
}
Y ahora creamos los 4 métodos en la ventana BookUI:
1
2
3
4
5
6
7
8
9
10
11
12
13
14
15
16
private void next(){
    this.book = bookController.next().orElse(null);
    updateData();
}
private void previous(){
    this.book = bookController.previous().orElse(null);
    updateData();
}
private void last(){
    this.book = bookController.last().orElse(null);
    updateData();
}
private void first(){
    this.book = bookController.first().orElse(null);
    updateData();
}
Ya podéis navegar por la tabla
Guardar un registro
Es tan sencillo como subscribir el botón Save a un evento y en él llamar a bookRepository.save(). Pero primero hemos de crear otro repositorio que sí extienda CrudRepository para así poder trabajar con los métodos que provee este.
1
2
3
4
5
6
7
8
9
10
package jpaswing.repository;

import jpaswing.entity.Book;
import org.springframework.data.repository.CrudRepository;
import org.springframework.stereotype.Component;

@Component
public interface BookRepository extends CrudRepository<Book, Long> {

}
Creamos el botón
1
2
3
4
5
6
7
8
9
....
    private JButton saveButton;
....
public void initComponents(){
    ....
        saveButton = new JButton("Save");
        saveButton.addActionListener(e -> saveEntity());
    ....
}
Y el método saveEntity
1
2
3
4
5
private void saveEntity() {
    book.setName(nameField.getText());
    this.bookRepository.save(book);
    JOptionPane.showMessageDialog(this, "Entity saved successfully!");
}
Reto Deberás añadir un nuevo parámetro a la clase
BookUIde tipoBookRepositorye inyectarlo en el constructor. Además deberás añadir un nuevo parámetro enSwingApplicationCommandLineRunner
Crear un nuevo registro
Vamos a crear un botón New que nos permita introducir un nuevo registro.
En primer lugar vamos a crear una propiedad que nos indique si la pantalla está en modo New o no,
1
private boolean isNew;
Y en el constructor
1
2
3
4
if (this.book == null)
    isNew = true;
else
    isNew = false;
Crea el botón para
Newque esté alineado conSave
El método del listener es el siguiente:
1
2
3
4
5
private void newEntity() {
    this.isNew = true;
    nameField.setText("");
    idField.setText("");
}
Ya sólo nos queda modificar save para que discrimine si hemos de actualizar uno existente o crear uno nuevo.
1
2
3
4
5
6
7
8
9
private void saveEntity() {
    if (this.isNew)
        book = new Book();
    book.setName(nameField.getText());
    this.bookRepository.save(book);
    JOptionPane.showMessageDialog(this, "Entity saved successfully!");
    this.isNew = false;
    this.updateData();
}
Cancelar la creación de un registro
Por último, vamos a dar la posibilidad de cancelar la creación de un registro.
Usaremos para ello el botón New pero añadiendo lógica para distinguir si estamos dando uno nuevo o no.
1
2
3
4
5
6
7
8
9
10
11
12
private void newEntity() {
    if (this.isNew) {
        this.isNew = false;
        newButton.setText("New");
        updateData();
    }else {
        this.isNew = true;
        nameField.setText("");
        idField.setText("");
        newButton.setText("Cancel");
    }
}
Por último vamos a modificar initComponents para que ponga new si hay ningún libro y Cancel si no lo hay.