Manejo de eventos
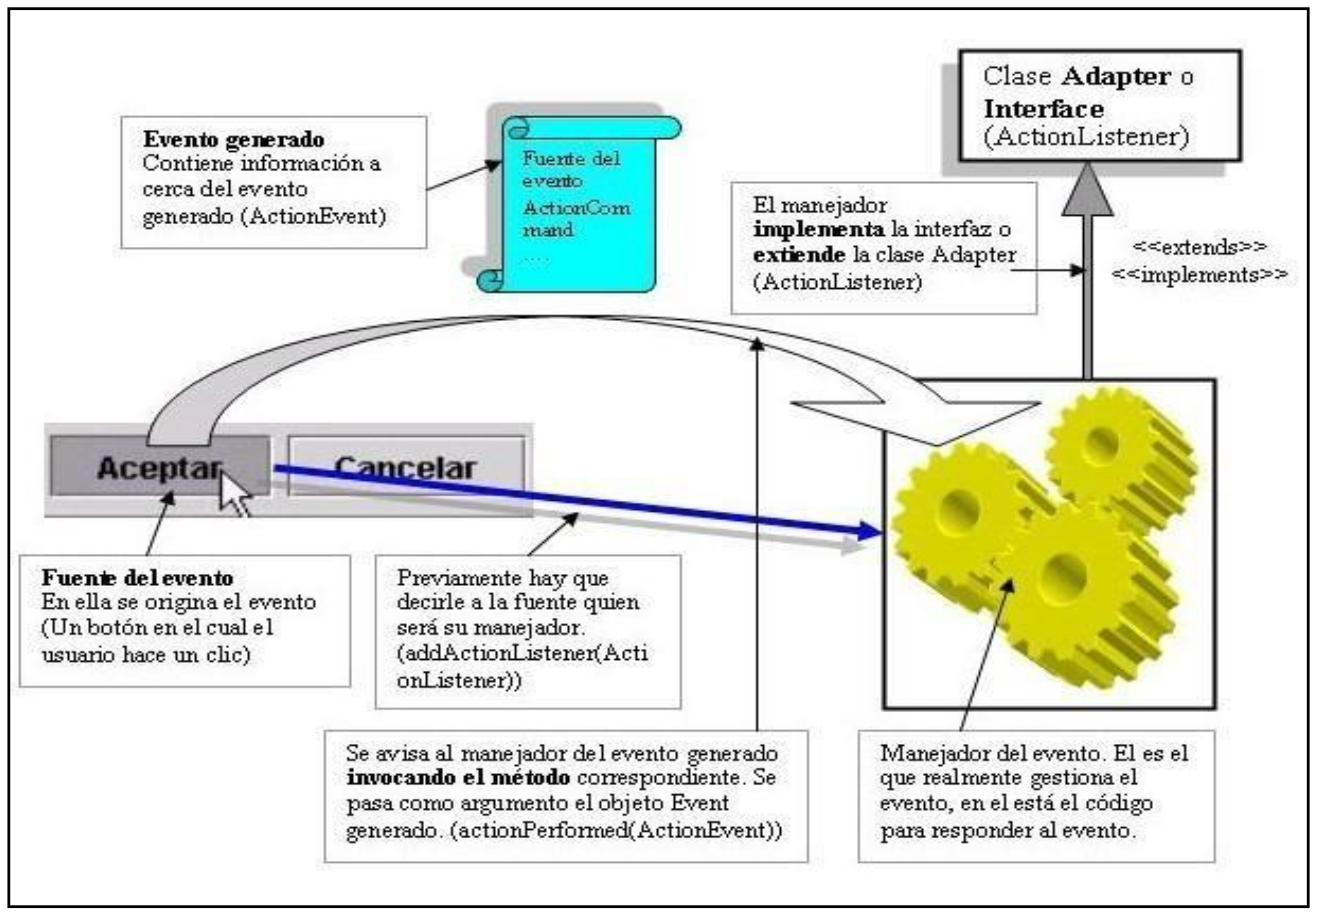
Problema
¿Qué hacer para que un botón haga algo cuando un usuario hace clic en él?
Solución
Añadir un ActionListener.
ActionListener
Los listeners de eventos vienen en media docena de tipos diferentes. El más común es el ActionListener, utilizado por los botones de comando, los campos de texto y algunos otros componentes para indicar que el usuario ha realizado una acción de alto nivel, como activar un botón de comando o presionar Intro en un campo de texto. El paradigma es que crea un objeto listener, lo registra con el origen del evento (como el botón) y espera. Más tarde, cuando el usuario presiona el botón, el botón llamará a su listener.

Implementación de ActionListener.
1
2
3
4
5
6
7
8
9
10
11
12
13
package java.awt.event;

import java.util.EventListener;

public interface ActionListener extends EventListener
{
	/**
	 * This method is invoked when an action occurs.
	 *
	 * @param event the <code>ActionEvent</code> that occurred
	*/
	void actionPerformed(ActionEvent event);
}
Como se puede observar, sólo tiene un método llamado actionPerformed.
Primera forma
Un clase que implemente ActionListener
1
2
3
4
5
6
7
8
9
10
11
12
13
14
15
16
17
18
19
20
21
22
23
24
25
26
27
28
29
30
31
32
33
/**
 * @author victor
 */
package eventos;

import java.awt.FlowLayout;
import java.awt.event.ActionEvent;
import java.awt.event.ActionListener;

import javax.swing.JButton;
import javax.swing.JFrame;
import javax.swing.SwingUtilities;

/** Demonstrate simple use of Button */
public class ButtonDemo extends JFrame implements ActionListener {
	JButton b1;

	public ButtonDemo() {
		setLayout(new FlowLayout());
		add(b1 = new JButton("A button"));
		b1.addActionListener(this);
		setSize(300, 200);
	}

	public void actionPerformed(ActionEvent event) {
		System.out.println("Thanks for pushing my button!");
	}

	public static void main(String[] unuxed) {

		SwingUtilities.invokeLater(() -> new ButtonDemo().setVisible(true));
	}
}
Como implementa ActionListener debe implementar el método actionPerformed (según establece la interfaz)
Para que el botón escuche el evento, hemos de llamar al método addActionListener(this).
Esta versión no usa una clase interna para manejar los eventos, pero sí lo hace implementando directamente la interfaz ActionListener. Esto funciona para programas pequeños, pero a medida que una aplicación crece, rápidamente se vuelve inservible; ¿Cómo se sabe a qué botón se presionó? Para resolver este problema, normalmente usamos una clase interna como el controlador de acciones y tenemos una clase diferente para cada botón, o al menos para cada conjunto de acciones relacionado. Primero, escribamos el código anterior con dos botones para que puedas ver lo que quiero decir:
1
2
3
4
5
6
7
8
9
10
11
12
13
14
15
16
17
18
19
20
21
22
23
24
25
26
27
28
29
30
31
32
33
34
35
36
37
38
39
40
41
/**
 * @author victor
 */
package eventos;

import java.awt.FlowLayout;
import java.awt.event.ActionEvent;
import java.awt.event.ActionListener;

import javax.swing.JButton;
import javax.swing.JFrame;
import javax.swing.SwingUtilities;

/** Demonstrate simple use of Button */
public class ButtonDemoDos extends JFrame implements ActionListener {
	JButton b1;
	JButton b2;
	public ButtonDemoDos() {
		setLayout(new FlowLayout());

		add(b1 = new JButton("A button"));
		b1.addActionListener(this);

		add(b2 = new JButton("Another button"));
		b2.addActionListener(this);

		setSize(300, 200);
	}

	public void actionPerformed(ActionEvent event) {
		if (event.getSource() == b1)
			System.out.println("Thanks for pushing my first button!");
		else
			System.out.println("Thanks for pushing my second button!");
	}

	public static void main(String[] unuxed) {

		SwingUtilities.invokeLater(() -> new ButtonDemoDos().setVisible(true));
	}
}
Ahora aquí está el mismo programa escrito usando una clase interna miembro, es decir, una clase que es una parte nombrada de su clase contenedora:
1
2
3
4
5
6
7
8
9
10
11
12
13
14
15
16
17
18
19
20
21
22
23
24
25
26
27
28
29
30
31
32
33
34
35
36
37
38
39
40
41
42
43
44
45
/**
 * @author victor
 */
package eventos;

import java.awt.FlowLayout;
import java.awt.event.ActionEvent;
import java.awt.event.ActionListener;

import javax.swing.JButton;
import javax.swing.JFrame;
import javax.swing.SwingUtilities;

/** Demonstrate simple use of Button */
public class ButtonDemoTres extends JFrame {
	JButton b1;
	JButton b2;
	ActionListener handler = new ButtonHandler();

	public ButtonDemoTres() {
		setLayout(new FlowLayout());

		add(b1 = new JButton("A button"));
		b1.addActionListener(handler);

		add(b2 = new JButton("Another button"));
		b2.addActionListener(handler);

		setSize(300, 200);
	}

	class ButtonHandler implements ActionListener {
		public void actionPerformed(ActionEvent e) {
			if (e.getSource() == b1)
				System.out.println("Thanks for pushing my first button!");
			else
				System.out.println("Thanks for pushing my second button!");
		}
	}

	public static void main(String[] unuxed) {

		SwingUtilities.invokeLater(() -> new ButtonDemoTres().setVisible(true));
	}
}
Ten en cuenta que simplemente dividir el código de manejo de acciones en su propia clase realmente no contribuye mucho a la legibilidad. Pero hay una manera de usar clases internas que promueve la legibilidad y la capacidad de mantenimiento. Creamos una clase interna para cada origen de evento: cada botón, cada elemento del menú, etc. Parece un montón de trabajo, y lo sería si usaras el método anterior. Pero hay una manera más corta, utilizando clases internas anónimas, que se describen a continuación.
Manejo de acciones usando clases internas anónimas
Las clases internas anónimas se declaran y se crean instancias al mismo tiempo, utilizando el operador new con el nombre de una clase o interfaz existente. Si nombras una clase, será subclasificada; Si nombras una interfaz, la clase anónima extenderá java.lang.Object e implementará la interfaz nombrada. El paradigma es:
1
2
3
4
5
b.addActionListener(new ActionListener( ) {
	public void actionPerformed(ActionEvent e) {
		System.out.println("Thanks for pushing my second button!");
	}
});
¿Te has fijado en el }); en la última línea? Bien, porque es importante. El } termina la definición de la clase interna, mientras que el ) termina la lista de argumentos al método addActionListener; el único argumento dentro del paréntesis es un argumento de tipo ActionListener que se refiere a la única instancia creada de su clase anónima.
1
2
3
4
5
6
7
8
9
10
11
12
13
14
15
16
17
18
19
20
21
22
23
24
25
26
27
28
29
30
31
32
33
34
35
36
37
38
39
40
41
42
43
/**
 * @author victor
 */
package eventos;

import java.awt.FlowLayout;
import java.awt.event.ActionEvent;
import java.awt.event.ActionListener;

import javax.swing.JButton;
import javax.swing.JFrame;
import javax.swing.SwingUtilities;

/** Demonstrate simple use of Button */
public class ButtonDemoCuatro extends JFrame {
	JButton b1;
	JButton b2;

	public ButtonDemoCuatro() {
		setLayout(new FlowLayout());

		add(b1 = new JButton("A button"));
		b1.addActionListener(new ActionListener() {
			public void actionPerformed(ActionEvent e) {
				System.out.println("Thanks for pushing my first button!");
			}
		});

		add(b2 = new JButton("Another button"));
		b2.addActionListener(new ActionListener() {
			public void actionPerformed(ActionEvent e) {
				System.out.println("Thanks for pushing my second button!");
			}
		});

		setSize(300, 200);
	}

	public static void main(String[] unuxed) {

		SwingUtilities.invokeLater(() -> new ButtonDemoCuatro().setVisible(true));
	}
}
El beneficio real de estas clases internas anónimas, por cierto, es que mantienen el código de manejo de acciones en el mismo lugar donde se está instanciando el control de GUI. Esto ahorra mucho mirar hacia atrás y adelante para ver lo que realmente hace un control GUI.
Manejo de acciones usando lambdas
El método de evento más común en Swing es el método addActionListener() de JComponent. Debido a que ActionListener es un método funcional se puede usar directamente con expresiones lambda:
1
2
3
4
5
6
7
8
9
10
11
12
13
14
15
16
17
18
19
20
21
22
23
24
25
26
27
28
29
30
31
32
33
34
35
36
37
38
39
/**
 * @author victor
 */
package eventos;

import java.awt.FlowLayout;
import java.awt.event.ActionEvent;
import java.awt.event.ActionListener;

import javax.swing.JButton;
import javax.swing.JFrame;
import javax.swing.SwingUtilities;

/** Demonstrate simple use of Button */
public class ButtonDemoCinco extends JFrame {
	JButton b1;
	JButton b2;

	public ButtonDemoCinco() {
		setLayout(new FlowLayout());

		add(b1 = new JButton("A button"));
		b1.addActionListener((e) -> {
			System.out.println("Thanks for pushing my first button!");
		});

		add(b2 = new JButton("Another button"));
		b2.addActionListener((e) -> {
			System.out.println("Thanks for pushing my second button!");
		});

		setSize(300, 200);
	}

	public static void main(String[] unuxed) {

		SwingUtilities.invokeLater(() -> new ButtonDemoCinco().setVisible(true));
	}
}
Terminar un programa con “Cerrar ventana”
No ocurre nada cuando haces clic en el botón de cerrar en la barra de título de un Frame AWT. Cuando haces esto en un Swing JFrame, la ventana desaparece pero la aplicación no se cierra.
La forma más sencilla de finalizar la aplicación es la siguiente:
1
setDefaultCloseOperation(JFrame.EXIT_ON_CLOSE);
Pero también podemos implementar WindowListener.
1
2
3
4
5
6
7
8
9
10
11
12
13
14
15
16
17
18
19
20
21
22
23
24
25
26
27
28
29
30
31
32
33
34
35
36
37
38
39
40
41
42
43
44
45
46
/**
 * @author victor
 */
package eventos;

import java.awt.FlowLayout;
import java.awt.event.ActionEvent;
import java.awt.event.ActionListener;
import java.awt.event.WindowAdapter;
import java.awt.event.WindowEvent;

import javax.swing.JButton;
import javax.swing.JFrame;
import javax.swing.JOptionPane;
import javax.swing.SwingUtilities;

/** Demonstrate simple use of Button */
public class CerrarVentana extends JFrame {

	public CerrarVentana() {
		setLayout(new FlowLayout());
		setDefaultCloseOperation(JFrame.DO_NOTHING_ON_CLOSE);
		addWindowListener(new CerrarVentanaAdapter());

		setSize(300, 200);

	}

	/** Named Inner class that closes a Window. */
	class CerrarVentanaAdapter extends WindowAdapter {
		public void windowClosing(WindowEvent e) {

			int opc = JOptionPane.showConfirmDialog(null, "Está seguro de cerrar la Ventana",
					"Título Diálogo",
					JOptionPane.YES_NO_OPTION);
			if (opc == 0) {
				System.exit(0);
			}
		}
	}

	public static void main(String[] unuxed) {

		SwingUtilities.invokeLater(() -> new CerrarVentana().setVisible(true));
	}
}
En este caso lo que hacemos en extender WindowAdapter e implementar el método windowClosing al que se llama antes de cerrar la ventana. Pedimos confirmación mediante un diálogo y salimos en el caso de que se elija Sí.
WindowAdapter es una clase que implementa el interfaz WindowListener y que tiene todos los métodos implementados pero con un cuerpo vacío. De esta forma las clases no deben implementar WindowListener sino extender WindowAdapter y sólo sobrescribir aquellos métodos que interese.
Más información:
https://docs.oracle.com/javase/7/docs/api/java/awt/event/WindowListener.html
ItemListener
ItemListener es un manejador que escucha todos los eventos relacionados con la selección o cambio de algún ítem en un componente que implica selección.
Para ello debemos implementar la interfaz ItemListener que sólo tiene un método: itemStateChanged
Este tipo de interfaces con sólo un método se pueden usar como funciones lambda.
Por ejemplo:
1
2
3
4
5
6
7
8
9
10
11
12
13
14
15
16
17
18
19
20
21
22
23
24
25
26
27
28
29
30
31
32
33
34
35
36
37
38
39
40
41
42
43
44
45
46
47
48
49
50
package eventos;

import javax.swing.*;
import java.awt.event.ItemEvent;

public class JComboBoxTutorial {
	JFrame frame = new JFrame();
	JPanel panel = new JPanel();
	JComboBox<String> comboBox = new JComboBox<String>();
	DefaultComboBoxModel<String> model = new DefaultComboBoxModel<String>();
	JTextField txtAdd = new JTextField(15);
	JButton btnAdd = new JButton("Add");
	JButton btnRemove = new JButton("Remove");
	String selectedValue;

	public JComboBoxTutorial() {
		comboBox.setModel(model);
		comboBox.addItemListener((e) -> {
			if (e.getStateChange() == ItemEvent.SELECTED) {
				selectedValue = model.getSelectedItem().toString();
				System.out.println(selectedValue);
			}
		});

		btnRemove.addActionListener((e) -> {
			model.removeElement(selectedValue);
		});

		btnAdd.addActionListener((e) -> {
			model.addElement(txtAdd.getText());
			frame.pack();
		});

		panel.add(txtAdd);
		panel.add(btnAdd);
		panel.add(comboBox);
		panel.add(btnRemove);
		frame.add(panel);
		frame.setDefaultCloseOperation(JFrame.EXIT_ON_CLOSE);
		frame.pack();
		frame.setVisible(true);

	}

	public static void main(String[] args) {
		SwingUtilities.invokeLater(() -> {
			new JComboBoxTutorial();
		});
	}
}
Si no usáramos lambdas, quedaría así:
1
2
3
4
5
6
7
8
9
10
11
12
13
14
15
16
17
18
19
20
21
22
23
24
25
26
27
28
29
30
31
32
33
34
35
36
37
38
39
40
41
42
43
44
45
46
47
48
49
50
51
52
package eventos;

import javax.swing.*;
import java.awt.event.ItemEvent;
import java.awt.event.ItemListener;

public class JComboBoxTutorialDos implements ItemListener{
	JFrame frame = new JFrame();
	JPanel panel = new JPanel();
	JComboBox<String> comboBox = new JComboBox<String>();
	DefaultComboBoxModel<String> model = new DefaultComboBoxModel<String>();
	JTextField txtAdd = new JTextField(15);
	JButton btnAdd = new JButton("Add");
	JButton btnRemove = new JButton("Remove");
	String selectedValue;

	public JComboBoxTutorialDos() {
		comboBox.setModel(model);
		comboBox.addItemListener(this);

		btnRemove.addActionListener((e) -> {
			model.removeElement(selectedValue);
		});

		btnAdd.addActionListener((e) -> {
			model.addElement(txtAdd.getText());
			frame.pack();
		});

		panel.add(txtAdd);
		panel.add(btnAdd);
		panel.add(comboBox);
		panel.add(btnRemove);
		frame.add(panel);
		frame.setDefaultCloseOperation(JFrame.EXIT_ON_CLOSE);
		frame.pack();
		frame.setVisible(true);

	}
	@Override
	public void itemStateChanged(ItemEvent e) {
		if (e.getStateChange() == ItemEvent.SELECTED) {
			selectedValue = model.getSelectedItem().toString();
			System.out.println(selectedValue);
		}
	}
	public static void main(String[] args) {
		SwingUtilities.invokeLater(() -> {
			new JComboBoxTutorialDos();
		});
	}
}
Otro ejemplo:
1
2
3
4
5
6
7
8
9
10
11
12
13
14
15
16
17
18
19
20
21
22
23
24
25
26
27
28
29
30
31
32
33
34
35
36
37
38
39
40
41
42
43
44
45
46
47
48
49
50
51
52
53
54
55
56
57
58
59
60
61
62
63
64
/**
 * @author victor
 */
package eventos;

import java.awt.Dimension;
import java.awt.Font;
import java.awt.event.ItemEvent;
import java.awt.event.ItemListener;

import javax.swing.JCheckBox;
import javax.swing.JFrame;
import javax.swing.JPanel;
import javax.swing.JTextField;
import javax.swing.SwingUtilities;

public class EjemploItemListener extends JFrame implements ItemListener {

	JCheckBox bold = new JCheckBox("Bold");
	JCheckBox italic = new JCheckBox("Italic");
	JTextField txt = new JTextField(20);
	private int valBold = Font.PLAIN;
	private int valItalic = Font.PLAIN;

	public EjemploItemListener() {
		JPanel panel = new JPanel();
		bold.addItemListener(this);
		italic.addItemListener(this);
		txt.setText("Esto es un ejemplo");
		panel.add(txt);
		panel.add(bold);
		panel.add(italic);
		this.setContentPane(panel);
		this.setSize(new Dimension(400, 70));
		this.setVisible(true);
	}

	@Override
	public void itemStateChanged(ItemEvent e) {
		if (e.getSource() == bold) {
			if (e.getStateChange() == ItemEvent.SELECTED) {
				valBold = Font.BOLD;
			} else {
				valBold = Font.PLAIN;
			}
		}
		if (e.getSource() == italic) {
			if (e.getStateChange() == ItemEvent.SELECTED) {
				valItalic = Font.ITALIC;
			} else {
				valItalic = Font.PLAIN;
			}
		}
		Font font = new Font("Courier", valBold | valItalic, 12);
		txt.setFont(font);
	}

	public static void main(String[] args) {
		SwingUtilities.invokeLater(() -> {
			new EjemploItemListener();
		});
	}
}
Fijaos que cuando tenemos el mismo manejador para varios componentes, usamos el método e.getSource() para saber qué componente ha provocado el evento.
Ejemplos
En el siguiente archivo tenéis más ejemplos de componentes y eventos.